官网永远是最好的学习资料:https://pytorch-geometric.readthedocs.io/en/latest/
跟着配套colaboratory的教程走,大概一天能学完五个教程,学完也算基本入门pytroch-geometric了。
1. Introduction.ipynb - Colaboratory (google.com)
- This concludes the first introduction into the world of GNNs and PyTorch Geometric. In the follow-up sessions, you will learn how to achieve state-of-the-art classification results on a number of real-world graph datasets.
- 概要:介绍图的基本结构,GCN怎么用。
2. Node Classification.ipynb - Colaboratory (google.com)
- In this chapter, you have seen how to apply GNNs to real-world problems, and, in particular, how they can effectively be used for boosting a model’s performance. In the next section, we will look into how GNNs can be used for the task of graph classification.
- 概要:用GNN实现某些真实的节点分类任务,与MLP效果更好。
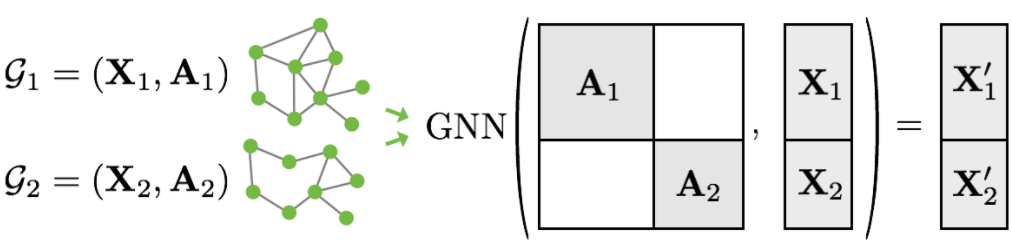
3. Graph Classification.ipynb - Colaboratory (google.com)
In this chapter, you have learned how to apply GNNs to the task of graph classification. You have learned how graphs can be batched together for better GPU utilization, and how to apply readout layers for obtaining graph embeddings rather than node embeddings.
In the next session, you will learn how you can utilize PyTorch Geometric to let Graph Neural Networks scale to single large graphs.
概要:学习了应用GNN实现图分类。学习了GNN上的mini-batch是如何构造以更好利用GPU。学习了如何用readout层获取图的表示。
- 和图像一样用padding和rescaling让图大小相同太浪费空间,所以用对角矩阵相连的方法处理。在torch里是用稀疏矩阵存储的,所以开销不大。
- Dataloader和torch里差不多
train_loader = DataLoader(train_dataset, batch_size=64, shuffle=True)。 DataBatch(edge_index=[2, 2636], x=[1188, 7], edge_attr=[2636, 4], y=[64], batch=[1188], ptr=[65])里的batch记录的是每个节点在哪个图里,batch = [0,…,0,1,…,1,2,…,2]表示一个batch里有三张图- nn.GraphConv() 有residual connection。
- 图的表示可以写成所有节点的均值
x = global_mean_pool(x, batch)
4. Scaling GNNs.ipynb - Colaboratory (google.com)
In this chapter, you have been presented a method to scale GNNs to large graphs, which otherwise would not fit into GPU memory.
This also concludes the hands-on tutorial on deep graph learning with PyTorch Geometric. If you want to learn more about GNNs or PyTorch Geometric, feel free to check out PyG’s documentation, its list of implemented methods as well as its provided examples, which cover additional topics such as link prediction, graph attention, mesh or point cloud convolutions and other methods for scaling up GNNs.
Happy hacking!
概要:介绍了了降低显存的方法,cluster-gnn,使得训练超大图成为可能。
不再在整个图上划分mini-batch,先分成sub-graph再分mini-batch,解决了邻居爆炸(。。邻居数量)问题
分太开也不好,所以cluster以后随机对sub-graph再连接
ClusterDataconverts aDataobject into a dataset of subgraphs containingnum_partspartitions.- Given a user-defined
batch_size,ClusterLoaderimplements the stochastic partitioning scheme in order to create mini-batches.
这种采样方法,只用改划分数据的代码,训练过程不变。
5. Point Cloud Classification.ipynb - Colaboratory (google.com)
概要:介绍了点云分类任务的三大步骤。又在PointNet++和PPFNet的实践中,介绍了如何自定义MessagePassing以及采样策略。
PointNet++
Grouping阶段,用knn graph或者半径图
```python
from torch_cluster import knn_graph
根据点的坐标计算最近的k个点,连起来1
2
3
4
5
6
7
8
9
10
11
12
13
- 邻居聚合阶段。聚合邻居信息

  - 从

    ```python
    class PointNetLayer(torch_geometric.nn.MessagePassing):
    	def __init__(self, in_channels, out_channels):
            pass
        def forward(self, h, pos, edge_index):
            pass
        def message(self, h_j, pos_j, pos_i):
            pass
继承,并定义出一个与
GraphConv()、GCNConv()同一级别的类,例如一种新的卷积层。MessagePassing接口通过自动处理消息传播,来帮助我们创建消息传递图神经网络。只需要定义 message 功能即可。
def message()定义如何构建一个可学习的message给每条边(每个边对应一个邻居,所以也可以看成定义message给每个邻居),以及传播的规则def forward()调用propagate(),开始传播PPFNet,解决旋转不变性
downsampling(下采样)阶段
Farthest Point Sampling (FPS) 最远点采样。使得每次采点都和已经采样的点距离最远。这种方式证明比随机采样更能覆盖整个点集。
不同batch中fps是独立的,所以要传入batch向量
index = fps(pos, batch, ratio=0.5)conda create -n pyg python==3.8.01
2
3
4
5
6
7
8
9
10
11
12
13
[6. GNN Explanation.ipynb - Colaboratory (google.com)](https://colab.research.google.com/drive/1fLJbFPz0yMCQg81DdCP5I8jXw9LoggKO?usp=sharing#scrollTo=F1op-CbyLuN4)
- 占坑
# 安装
建个新环境pip install torch==1.10.01
2
3
安装torchpip install xxx.whl1
2
3
4
5
6
7
8
9
10
11
12
13
14
15
16
17
18
19
20
21
22
23
24
25
26
27
安装依赖包
## 方法1:

官网安装比较省事,但是可以看到只有最新的几个版本,如果你的pytorch版本比较旧(旧也是为了稳定...)可以尝试方法2。
## 方法2:
https://data.pyg.org/whl/
根据pytorch版本和cuda版本,在这个网站选择对应版本进入,例如我是torch-1.10和cuda-10.2,所以进入https://data.pyg.org/whl/torch-1.10.0+cu102.html
然后根据系统类型和python版本,下好安装包,如下
torch_**scatter**-2.0.9-cp38-cp38-linux_x86_64.whl
torch_**sparse**-0.6.12-cp38-cp38-linux_x86_64.whl
torch_**cluster**-1.5.9-cp38-cp38-linux_x86_64.whl
torch_spline_conv-1.2.1-cp38-cp38-linux_x86_64.whl
最后用pip离线离线安装
注意要切换到安装目录,且按顺序安装 scatter—>sparse—>cluster—>spline